Getting started with Snowflake Open Catalog
Overview
Snowflake Open Catalog is an open catalog for Apache Iceberg™. Open Catalog is available as an SaaS service managed on Snowflake. It is also available as open source code that you can build and deploy yourself. Open Catalog provides an implementation of the Apache Iceberg REST catalog with cross-engine security via role-based access control.
In this tutorial, you learn how to get started with Open Catalog managed on Snowflake.
What you’ll learn
How to create a new Open Catalog account.
How to create a new Iceberg catalog in the Open Catalog account and secure it using RBAC.
How to use Apache Spark™ to create tables in the catalog and run queries.
How to use Snowflake to run queries on tables in the catalog.
How to mirror or publish managed Iceberg tables in Snowflake to Open Catalog.
What you’ll need
ORGADMIN privileges in your Snowflake organization (to create a new Open Catalog account).
ACCOUNTADMIN privileges in your Snowflake account (to connect to the Open Catalog account). This Snowflake account does not have to be the same as the Snowflake organization account.
What you’ll do
You’ll complete two use cases:
Use case 1: Create a catalog in Open Catalog, create a table using Apache Spark, and query the table using Apache Spark and Snowflake.

Use case 2: Create an Apache Iceberg table in the Snowflake DB account using Snowflake, and publish it to Open Catalog so Apache Spark can run queries on it.
Set up the environment
Install Conda, Spark, and Jupyter on your laptop
In this tutorial, you can use Conda to easily create a development environment and download necessary packages. This is only needed if you follow use case 2 for using Apache Spark™ to read Snowflake-managed Apache Iceberg™ tables. This is not required to create or use Iceberg tables on Snowflake.
To install Conda, use the instructions specific to your OS:
Create a file named
environment.ymlwith the following contents:name: iceberg-lab channels: - conda-forge dependencies: - findspark=2.0.1 - jupyter=1.0.0 - pyspark=3.5.0 - openjdk=11.0.13
To create the environment needed, run the following in your shell:
conda env create -f environment.yml
Create an Open Catalog account
An Open Catalog account can be created only by an ORGADMIN.
In Snowsight, in the navigation pane, select Admin > Accounts.
In the + Account drop-down, select Create Snowflake Open Catalog Account.
Complete the Create Snowflake Open Catalog Account dialog:
Cloud: The cloud provider where you want to store Apache Iceberg™ tables.
Region: The region where you want to store Iceberg tables.
Edition: The edition for your Open Catalog account.
Select Next.
From the Create New Account dialog, complete the Account Name, User Name, Password, and Email fields.
Select Create Account. Your new Open Catalog Account is created and a confirmation box appears.
In the confirmation box, select the Account Locator URL to open the Account Locator URL in your web browser.
Bookmark the Account Locator URL. When signing in to Open Catalog, you must specify the Account Locator URL.
Sign in to the Open Catalog web interface
Click the account URL that you received via email after creating the account, OR go to https://app.snowflake.com.
Click Sign into a different account and sign in with the Open Catalog account created earlier.
Use case 1: Create a table using Apache Spark™
Create an IAM policy that grants access to your S3 location
If you don’t have one already, start by creating an IAM policy that grants access to your S3 location. For instructions on creating this policy, see Create an IAM policy that grants access to your S3 location.
Create an IAM role
If you don’t have one already, create an AWS IAM role for Open Catalog to grant privileges on your S3 bucket. For instructions, see Create an IAM role. When the instructions prompt you to select a policy, select the IAM policy that grants access to your S3 location.
Create an internal catalog in Open Catalog
You can use an internal catalog in your Open Catalog account to create tables, query them, and run DML against the tables using Apache Spark™ or other query engines.
Sign in to your new Open Catalog account.
To create a new catalog, in the pane on the left, select Catalogs.
Select +Catalog in the upper right.
In the Create Catalog dialog, enter the following details:
Name: Name the catalog demo_catalog.
Default base location: The location where the table data will be stored.
Additional locations (optional): A comma separated list of multiple storage locations. It is mainly used if you need to import tables from different locations in this catalog. You can leave it blank.
S3 role ARN: An AWS role that has read-write access to storage locations. Enter the ARN of the IAM role that you created for Open Catalog.
External ID: (optional): A secret that you want to provide while creating a trust relationship between catalog user and storage account. If you skip this, it will be auto-generated. Use a simple string like abc123 for this tutorial.
Select Create. Your catalog is created and the following values are added to your catalog:
The IAM user arn for your Open Catalog account.
If you didn’t enter an External ID yourself, an External ID is auto-generated for your catalog.
You’ll need this values in the next section when you create a trust relationship.
Create a trust relationship
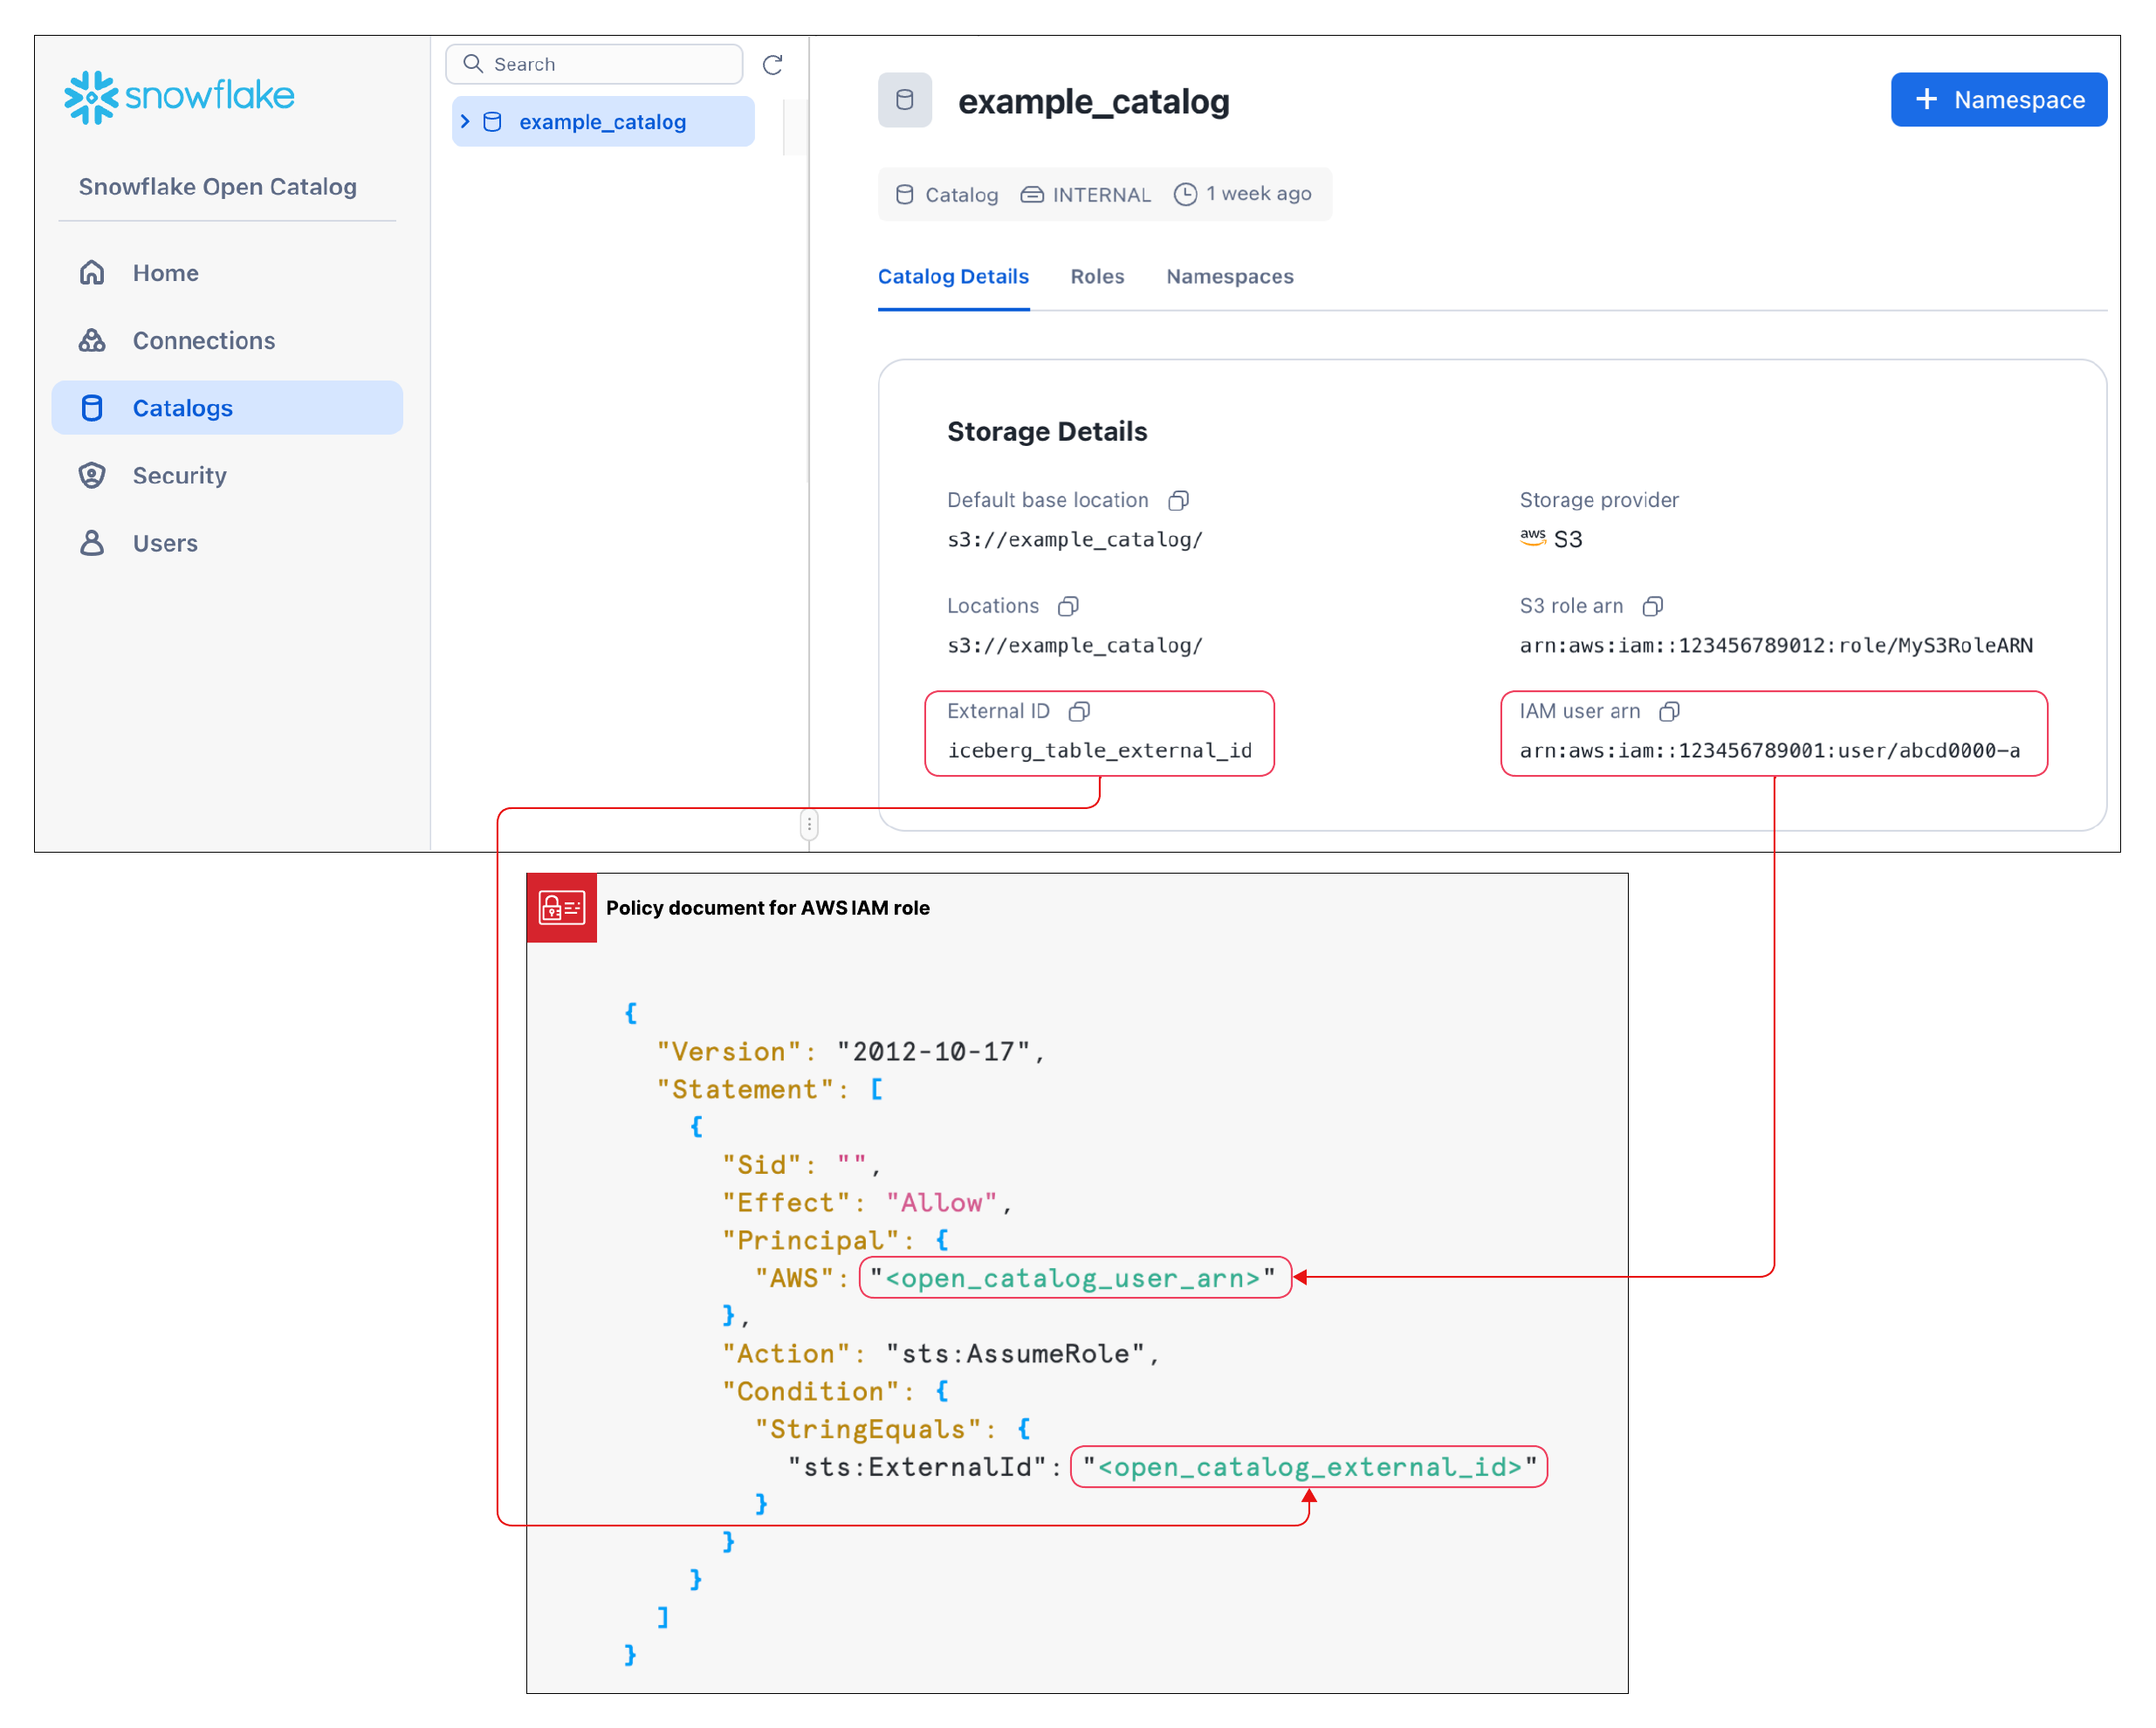
After creating a catalog, you need to set up a trust relationship so that the S3 role specified in the configuration above can read and write data in the storage location. Note that to complete this task, you will need the S3 IAM user arn and External ID for your catalog.
After the catalog is created, select your catalog in the list to display the S3 IAM user arn and External ID for your catalog.
To create the trust relationship, complete the instructions in Step 5: Grant the IAM user permissions to access bucket objects.
In the JSON object shown in these instructions:
For
<open_catalog_user_arn>, use the value under IAM user arn in the Open Catalog UI.For
<open_catalog_external_id>, use the value under External ID in the Open Catalog UI.
Configure a new service connection for Apache Spark™
Create a new connection (client_id/client_secret pair) for Apache Spark to run queries against the catalog that you just created.
In Open Catalog, in the left pane, select the Connections tab, and then select + Connection in the upper right.
In the Configure Service Connection dialog, create a new principal role or choose from one of the available roles.
Select Create.
From the Configure Service Connection dialog, to copy the Client ID and Client Secret to a text editor, select Copy inside the As <CLIENT ID>:<SECRET> field.
Important
You won’t be able to retrieve these text strings from the Open Catalog service later, so you must copy them now. You use these text strings when you configure Spark.
Set up catalog privileges for connection
Now you give privileges to the service connection so that it can access the catalog. Without access privileges, the service connection can’t run any queries on the catalog.
In the navigation pane, select Catalogs, and then select your catalog in the list.
To create a new role, select the Roles tab.
Select + Catalog role.
In the Create Catalog Role dialog, for Name, enter spark_catalog_role.
For Privileges, select CATALOG_MANAGE_CONTENT, and then select Create.
This gives the role privileges to create, read, and write to tables.
Select Grant to Principal Role.
In the Grant Catalog Role dialog, for Principal role to receive grant, select my_spark_admin_role.
For Catalog role to grant, select spark_catalog_role, and then select Grant.
As a result of this procedure, the role spark_catalog_role is granted to my_spark_admin_role, which gives admin privileges for the Spark connection that you created in the previous procedure.
Set up Spark
From your terminal, run the following commands to activate the virtual environment you created in the setup, and open Jupyter Notebooks:
conda activate iceberg-lab
jupyter notebook
Configure Spark
To register the service connection, run the following commands in a Jupyter notebook.
import os
os.environ['SPARK_HOME'] = '/Users/<username>/opt/anaconda3/envs/iceberg-lab/lib/python3.12/site-packages/pyspark'

import pyspark
from pyspark.sql import SparkSession

spark = SparkSession.builder.appName('iceberg_lab') \
.config('spark.jars.packages', 'org.apache.iceberg:iceberg-spark-runtime-3.5_2.12:1.4.1,software.amazon.awssdk:bundle:2.20.160,software.amazon.awssdk:url-connection-client:2.20.160') \
.config('spark.sql.extensions', 'org.apache.iceberg.spark.extensions.IcebergSparkSessionExtensions') \
.config('spark.sql.defaultCatalog', 'opencatalog') \
.config('spark.sql.catalog.opencatalog', 'org.apache.iceberg.spark.SparkCatalog') \
.config('spark.sql.catalog.opencatalog.type', 'rest') \
.config('spark.sql.catalog.opencatalog.header.X-Iceberg-Access-Delegation','vended-credentials') \
.config('spark.sql.catalog.opencatalog.uri','https://<open_catalog_account_identifier>.snowflakecomputing.com/polaris/api/catalog') \
.config('spark.sql.catalog.opencatalog.credential','<client_id>:<client_secret>') \
.config('spark.sql.catalog.opencatalog.warehouse','<catalog_name>') \
.config('spark.sql.catalog.opencatalog.scope','PRINCIPAL_ROLE:<principal_role_name>') \
.getOrCreate()

#Show namespaces
spark.sql("show namespaces").show()

#Create namespace
spark.sql("create namespace spark_demo")

#Use namespace
spark.sql("use namespace spark_demo")

#Show tables; this will show no tables since it is a new namespace
spark.sql("show tables").show()

#create a test table
spark.sql("create table test_table (col1 int) using iceberg");

#insert a record in the table
spark.sql("insert into test_table values (1)");

#query the table
spark.sql("select * from test_table").show();
For more information, see Register a service connection in Spark.
Parameters
Parameter |
Description |
|---|---|
|
Specifies the name of the catalog to connect to. |
|
Specifies the Maven coordinate for your external cloud storage provider:
|
|
Specifies the client ID for the service principal to use. |
|
Specifies the client secret for the service principal to use. |
|
Specifies the account identifier for your Open Catalog account. |
|
Specifies the principal role that is granted to the service principal. |
Optional: S3 cross region
When your Open Catalog account is hosted on Amazon S3 but is located in a different region compared to the region where your S3 storage bucket is located, you must provide an additional Spark configuration setting:
.config('spark.sql.catalog.opencatalog.client.region','<target_s3_region>') \
<target_s3_region> specifies the region where your S3 storage bucket is located. For the list of region codes, see Regional endpoints in the AWS documentation.
The following code example is modified to include the s3 region:
import pyspark
from pyspark.sql import SparkSession

spark = SparkSession.builder.appName('iceberg_lab') \
.config('spark.jars.packages', 'org.apache.iceberg:iceberg-spark-runtime-3.5_2.12:1.4.1,software.amazon.awssdk:bundle:2.20.160,software.amazon.awssdk:url-connection-client:2.20.160') \
.config('spark.sql.extensions', 'org.apache.iceberg.spark.extensions.IcebergSparkSessionExtensions') \
.config('spark.sql.defaultCatalog', 'opencatalog') \
.config('spark.sql.catalog.opencatalog', 'org.apache.iceberg.spark.SparkCatalog') \
.config('spark.sql.catalog.opencatalog.type', 'rest') \
.config('spark.sql.catalog.opencatalog.header.X-Iceberg-Access-Delegation','vended-credentials') \
.config('spark.sql.catalog.opencatalog.uri','https://<open_catalog_account_identifier>.snowflakecomputing.com/polaris/api/catalog') \
.config('spark.sql.catalog.opencatalog.credential','<client_id>:<secret>') \
.config('spark.sql.catalog.opencatalog.warehouse','<catalog_name>') \
.config('spark.sql.catalog.opencatalog.scope','PRINCIPAL_ROLE:<principal_role_name>') \
.config('spark.sql.catalog.opencatalog.client.region','<target_s3_region>') \
.getOrCreate()
Query the tables using Snowflake
You can create a catalog integration object in Snowflake and create an Apache Iceberg™ table in Snowflake that represents the table in Open Catalog. In the following example, you create an Iceberg table in Snowflake that represents the Iceberg table just created by Spark in the internal catalog in Open Catalog.
You can use the same Spark connection credentials, or you can create a new Snowflake connection. If you create a new connection, you have to set up roles and privileges accordingly.
Create a catalog integration object:
CREATE OR REPLACE CATALOG INTEGRATION demo_open_catalog_int
  CATALOG_SOURCE = POLARIS
  TABLE_FORMAT = ICEBERG
  CATALOG_NAMESPACE = '<catalog_namespace>'
  REST_CONFIG = (
    CATALOG_URI = 'https://<orgname>-<my-snowflake-open-catalog-account-name>.snowflakecomputing.com/polaris/api/catalog'
    CATALOG_NAME = ‘<catalog_name>’
  )
    REST_AUTHENTICATION = (
    TYPE = OAUTH
    OAUTH_CLIENT_ID = '<client_id>'
    OAUTH_CLIENT_SECRET = '<secret>'
    OAUTH_ALLOWED_SCOPES = ('PRINCIPAL_ROLE:ALL')
  )
  ENABLED = TRUE;

# the <catalog_namespace> created in previous step is spark_demo.
# the <catalog_name> created in previous step is demo_catalog.
Create the table representation in Snowflake using the catalog integration created above, and query the table:
CREATE OR REPLACE ICEBERG TABLE test_table
  CATALOG = 'demo_open_catalog_int'
  EXTERNAL_VOLUME = '<external_volume>'
  CATALOG_TABLE_NAME = 'test_table';

SELECT * FROM test_table;
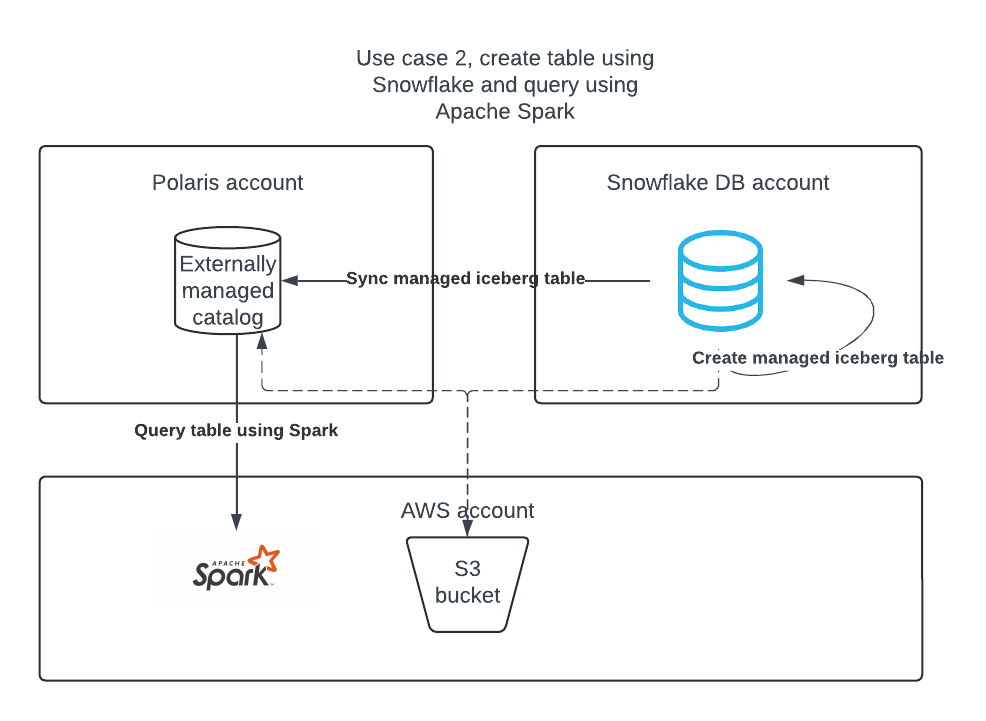
Use case 2: Sync Apache Iceberg™ tables from Snowflake to Open Catalog
If you have Iceberg tables in Snowflake, you can sync them to Open Catalog so other engines can query those tables.
Create an external catalog in Open Catalog
The Iceberg tables from Snowflake can be synchronized in an external catalog in your Open Catalog account.
Sign in to your new Open Catalog account.
To create a new catalog, in the pane on the left, select Catalogs.
Select +Catalog in the upper right.
In the Create Catalog dialog, enter the following details:
Name: Name the catalog demo_catalog_ext.
Set the toggle for External to On.
Default base location: The location where the table data will be stored.
Note
You must use a different storage location, compared to the internal catalog you created during Use case 1 of this tutorial. To ensure that the access privileges defined for a catalog are enforced correctly, two different catalogs can’t have overlapping locations.
Additional locations (optional): A comma separated list of multiple storage locations. It is mainly used if you need to import tables from different locations in this catalog. You can leave it blank.
S3 role ARN: An AWS role that has read-write access to storage locations.
External ID: (optional): A secret that you want to provide while creating a trust relationship between catalog user and storage account. If you skip this, it will be auto-generated. Use a simple string like abc123 for this tutorial.
Select Create. The following values are added to your catalog:
The IAM user arn for your Open Catalog account.
If you didn’t enter an External ID yourself, an External ID is auto-generated for your catalog.
Configure a new service connection for Snowflake
In Open Catalog, in the left pane, select the Connections tab, and then select + Connection in the upper right.
In the Configure Service Connection dialog, create a new principal role or choose from one of the available roles.
Select Create.
From the Configure Service Connection dialog, to copy the Client ID and Client Secret to a text editor, select Copy inside the As <CLIENT ID>:<SECRET> field.
Important
You won’t be able to retrieve these text strings from the Open Catalog service later, so you must copy them now. You use these text strings when you configure Spark.
Set up catalog privileges
To set up privileges on the external catalog so Snowflake connection has the right privileges for an external catalog, follow these steps:
In the navigation pane, select Catalogs, and then select your external catalog in the list.
To create a new role, select the Roles tab.
Select + Catalog role.
In the Create Catalog Role dialog, for Name, enter spark_catalog_role.
For Privileges, select CATALOG_MANAGE_CONTENT, and then select Create.
This gives the role privileges to create, read, and write to tables.
Select Grant to Principal Role.
In the Grant Catalog Role dialog, for Principal role to receive grant, select my_spark_admin_role.
For Catalog role to grant, select spark_catalog_role, and then select Grant.
Create a catalog integration object in Snowflake
In Snowflake, create a catalog integration object by using the CREATE CATALOG INTEGRATION (Snowflake Open Catalog) command. For CATALOG_NAME, specify the name of the external catalog that you configured in your Open Catalog account (demo_catalog_ext).
Snowflake syncs the table and its parent namespace to this external catalog in Open Catalog. For example, if you have an open_catalog_demo.iceberg.test_table_managed
Iceberg table registered in Snowflake and you specify demo_catalog_ext in the catalog integration, Snowflake syncs the table with Open Catalog with the following fully qualified name: demo_catalog_ext.open_catalog_demo.iceberg.test_table_managed.
CREATE OR REPLACE CATALOG INTEGRATION demo_open_catalog_ext
  CATALOG_SOURCE=POLARIS
  TABLE_FORMAT=ICEBERG
  REST_CONFIG = (
    CATALOG_URI = 'https://<orgname>-<my-snowflake-open-catalog-account-name>.snowflakecomputing.com/polaris/api/catalog'
    CATALOG_NAME = '<catalog_name>'
  )
  REST_AUTHENTICATION = (
    TYPE = OAUTH
    OAUTH_CLIENT_ID = '<client_id>'
    OAUTH_CLIENT_SECRET = '<secret>'
    OAUTH_ALLOWED_SCOPES = ('PRINCIPAL_ROLE:ALL')
  )
  ENABLED=TRUE;

# the <catalog_name> created in previous step is demo_catalog_ext.
Set up catalog sync
Before you can sync a Snowflake-managed Iceberg table to Open Catalog, you must specify the external catalog in Open Catalog that Snowflake should sync the table to.
To set up catalog sync, use the ALTER DATABASE command with the CATALOG_SYNC parameter. For the value of this parameter, specify the name of the catalog integration for Open Catalog. For example:
ALTER DATABASE open_catalog_demo SET CATALOG_SYNC = 'demo_open_catalog_ext';
After running this code, Snowflake syncs all Snowflake-managed Iceberg tables in the open_catalog_demo database to the <catalog_name> external catalog
in Open Catalog that you specified in the demo_open_catalog_ext catalog integration.
Create a Snowflake-managed Iceberg table
Create a Snowflake-managed Iceberg table and sync it from Snowflake to Open Catalog. For more information, see:
Important
The
STORAGE_BASE_URLfor the external volume must match the Default base location for the external catalog you created in Open Catalog.
use database open_catalog_demo;
use schema iceberg;

# Note that the storage location for this external volume will be different than the storage location for the external volume in use case 1

CREATE OR REPLACE EXTERNAL VOLUME snowflake_demo_ext
  STORAGE_LOCATIONS =
      (
        (
            NAME = '<storage_location_name>'
            STORAGE_PROVIDER = 'S3'
            STORAGE_BASE_URL = 's3://<s3_location>'
            STORAGE_AWS_ROLE_ARN = 'arn:aws:iam::<aws_acct>:role/<rolename>'
            STORAGE_AWS_EXTERNAL_ID = '<external_id>'
        )
      );

CREATE OR REPLACE ICEBERG TABLE test_table_managed (col1 int)
  CATALOG = 'SNOWFLAKE'
  EXTERNAL_VOLUME = 'snowflake_demo_ext'
  BASE_LOCATION = 'test_table_managed'
When you modify the table in Snowflake, the changes are automatically synchronized with the external catalog in your Open Catalog account. Other engines such as Apache Spark™ can query the table by connecting to Open Catalog.
Note
If the table fails to sync to Open Catalog, run the SYSTEM$SEND_NOTIFICATIONS_TO_CATALOG system function to diagnose the reason for the sync failure. For more information, see SYSTEM$SEND_NOTIFICATIONS_TO_CATALOG.
Conclusion
You can use an internal catalog in your Open Catalog account to create tables, query them, and run DML against the tables using Apache Spark™ or other query engines.
In Snowflake, you can create a catalog integration for Open Catalog to perform the following tasks:
Run queries on Open Catalog managed tables.
Sync Snowflake tables to an external catalog in your Open Catalog account.
What you learned
Create an Open Catalog account.
Create an internal catalog in your Open Catalog account.
Use Spark to create tables on the internal catalog.
Use Snowflake to create a catalog integration for Open Catalog to run queries on a table created on an internal catalog in your Open Catalog account.
Create an external catalog in your Open Catalog account.
Create a managed Apache Iceberg™ table in Snowflake and sync it, along with two parent namespaces, to the external catalog in your Open Catalog account. In the tutorial, you learned how to set up catalog sync at the database level. However, you can also set it up at the account, schema, or table level, and sync it with one parent namespace. For more information, see the following topics:
For an example of setting up catalog sync at the schema level, see Set up catalog sync at the schema level in the Snowflake documentation.
For more information on setting up catalog sync, see CATALOG_SYNC in the Snowflake documentation.
To sync the table with one parent namespace, set the CATALOG_SYNC_NAMESPACE_MODE property with the CREATE DATABASE command. To learn more, see CREATE DATABASE in the Snowflake documentation.
Note
If your third-party query engine can only query tables located up to the second namespace level in a catalog, you must sync the table with one parent namespace. Otherwise, Snowflake will sync the table to the third namespace level in Open Catalog and you can’t query the table.