Installing and configuring the connector with Snowsight
The Snowflake Connector for ServiceNow® is subject to the Snowflake Connector Terms.
This topic provides information on installing and configuring the Snowflake Connector for ServiceNow® through Snowsight.
Installing the Snowflake Connector for ServiceNow®
The following procedure describes how to install the connector:
Sign in to Snowsight as a user with the ACCOUNTADMIN role.
In the navigation menu, select Data Products » Marketplace.
Search for the Snowflake Connector for ServiceNow®, then select the tile for the connector.
In the page for the Snowflake Connector for ServiceNow®, select Get.
This displays a dialog that you use to begin the initial part of the installation process.
In the dialog configure the following:
In the Warehouse used for installation field, select the warehouse that you want to use for installing the connector.
Note
This is not the same warehouse that is used by the connector to synchronize data from ServiceNow®. In a later step, you will create a separate warehouse for this purpose.
Optionally, under Options » Application name you can change the name of the application.
Select Get.
A dialog appears with the notification:
Successfully Installed. To continue configuration, select Configure.The dialog closes, and the Snowflake Connector for ServiceNow® page displays the UI for configuring and managing the connector.
Configuring the Snowflake Connector for ServiceNow®
Sign in to Snowsight as a user with either the ACCOUNTADMIN role or any other role that meets the following requirements:
You must have these account-level privileges:
EXECUTE TASK WITH GRANT OPTION
EXECUTE MANAGED TASK WITH GRANT OPTION
EVENT_TABLE must be enabled on the account.
For warehouse access, you must have at least one of the following privileges:
The CREATE WAREHOUSE
OWNERSHIP
USAGE WITH GRANT OPTION
For database access, you must have at least one of the following privileges:
The CREATE DATABASE
OWNERSHIP
USAGE WITH GRANT OPTION
For schema access, you must have at least one of the following privileges:
CREATE DATABASE
OWNERSHIP
USAGE WITH GRANT OPTION
CREATE SCHEMA
USAGE, CREATE TABLE, CREATE VIEW WITH GRANT OPTION
Optional: For role access, you can create a new or select an existing role that will be assigned the DATA_READER application role. If you want to create a new role, then you need the CREATE ROLE privilege on your account. However, this is not necessary to complete the configuration.
In the navigation menu, select Data Products » Apps.
Search for the Snowflake Connector for ServiceNow®, then select it. You will be now moved to the installation wizard page, that will take you through the configuration process.
Below are listed application’s configuration steps:
Configure
In this dialog, fill in the following fields:
Field |
Description |
|---|---|
Warehouse |
Identifier for a dedicated virtual warehouse for the connector. Specify a name that is unique for your account. The name of the warehouse must be a valid object identifier. The configuration process creates a new |
Destination Database |
Identifier for database that will contain the schema with the tables for the ServiceNow® data in Snowflake. Specify a name that is unique for your account. The name of the database must be a valid object identifier. The configuration process creates or reuses a database with the specified name. |
Destination Schema |
Identifier for a schema that will contain the ServiceNow® data in Snowflake. The Snowflake Connector for ServiceNow® ingests ServiceNow® data into tables in this schema. Specify a name that is unique within the selected database. The name of the schema must be a valid object identifier. The configuration process creates or reuses a schema with the specified name. |
Role |
Identifier for a new custom role for the connector. This role will be granted the DATA_READER application role as well as USAGE privilege on Destination Database and Destination Schema. Specify a name that is unique for your account. The name of the role must be a valid object identifier. The configuration process creates a new role with the specified name. |
Note
By default, the fields are set to the names of objects that are created when you configure the connector. Snowflake recommends using new objects for these fields. However if needed, you can specify the names of existing objects, (for example if reinstalling the connector).
Attention
Make sure the warehouse is able to execute a query for at least 3 hours. It’s affected by a parameter value that can be set both on the warehouse used by the connector and on the account (account’s value takes precedence). To check the current values run:
SHOW PARAMETERS LIKE 'STATEMENT_TIMEOUT_IN_SECONDS' FOR ACCOUNT;
SHOW PARAMETERS LIKE 'STATEMENT_TIMEOUT_IN_SECONDS' FOR WAREHOUSE <connector_warehouse>;
If both values are at least 10800 (i.e. 3 hours), then no change is needed. Otherwise, run as necessary:
ALTER ACCOUNT SET STATEMENT_TIMEOUT_IN_SECONDS = 10800;
ALTER WAREHOUSE <connector_warehouse> SET STATEMENT_TIMEOUT_IN_SECONDS = 10800;
If the proper timeout is not provided, then data ingestion failures will occur.
Select Configure.
Authentication (Connect to ServiceNow)
If you’re not signed in as a user with the ACCOUNTADMIN role, ensure that you meet the following requirements:
You must have the CREATE INTEGRATION privilege.
If integrations were previously created by other roles, then the ownership of those integrations must to be transferred to your role.
If the CONNECTORS_SECRET database doesn’t exist, then you need the CREATE DATABASE privilege.
If CONNECTORS_SECRET database exists but was created by another role, then you need these privileges:
USAGE WITH GRANT OPTION
CREATE SCHEMA WITH GRANT OPTION
If CONNECTORS_SECRET.APP_NAME schema exists but was created by another role, then you need these privileges:
USAGE WITH GRANT OPTION
CREATE SECRET
CREATE NETWORK RULE
If CONNECTORS_SECRET.APP_NAME.SECRET exists but was created by another role, then its ownership needs to be transferred to your role.
If CONNECTORS_SECRET.APP_NAME.NETWORK_RULE exists but was created by another role, then its ownership needs to be transferred to your role.
The following procedure describes how to set up a connection to ServiceNow. You can select either basic authentication (username and password) or OAuth.
Select one of possible authentication methods: Basic authentication, OAuth2 or OAuth Client Credentials (recommended).
In the ServiceNow Instance field, enter the name of the ServiceNow® instance.
This is the first part of the hostname of your ServiceNow® instance. For example, if the URL to your ServiceNow® instance is:
https://myinstance.service-now.com
The name of your instance would be
myinstance.
Note
When using a custom domain, for example anything other than service-now.com, you must provide the full URL to the ServiceNow® instance.
Basic authentication flow
In ServiceNow username and ServiceNow password fields enter the credentials for your ServiceNow® account.
Select Connect.
OAuth2 authorization code flow
Create an endpoint for clients to access the instance and use it to configure the connector:
Login to your ServiceNow® instance, then select Homepage.
Search for System OAuth, then select Application Registry.
Select New, then select Create an OAuth API endpoint for external clients.
This displays a configuration page for the application registry as shown in the following image:
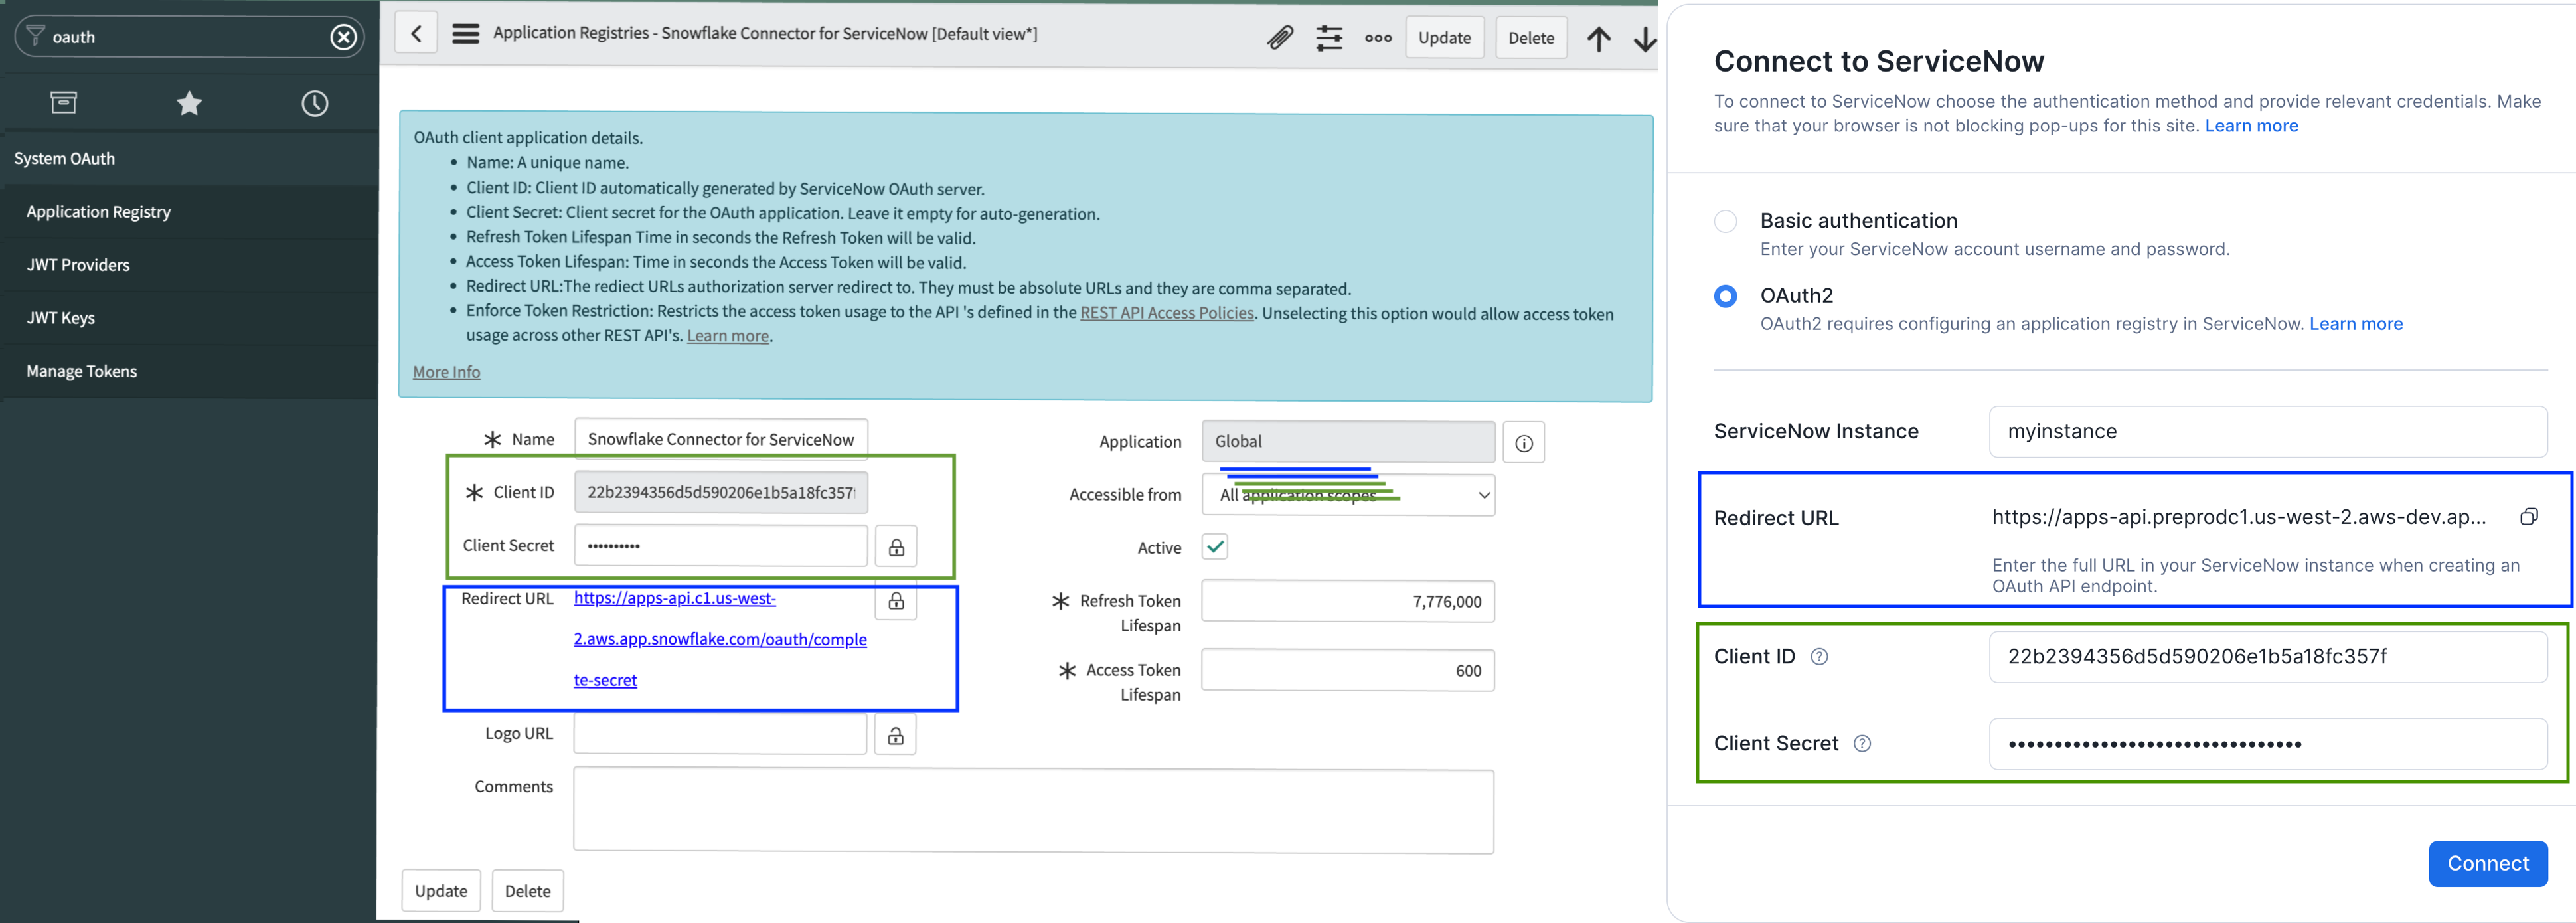
In ServiceNow, enter a name for the OAuth application registry in the Name field.
In Snowsight, copy the value in the Redirect URL field. In ServiceNow, paste this value in the Redirect URL field.
This value was generated by the connector.
If required, in ServiceNow, update the values in the Refresh Token Lifespan and Access Token Lifespan fields.
Snowflake recommends setting the lifespan of the access token to at least 600 seconds.
For the lifespan of the refresh token, specify a value that is 7776000 (90 days).
Attention
When Snowsight is opened via Private Link URL, the redirect URL is different than when Snowsight was opened via public URL. If you configured redirect URL using value provided by Private Link Snowsight, all subsequent updates to refresh token must also be done with Private Link Snowsight. If you are accessing Snowsight via publicly available URL, all subsequent updates to refresh token must also be done with Snowsight available at this URL.
In ServiceNow, select Submit.
The OAuth application registry appears in the list of application registries.
In ServiceNow, select the application registry you just created.
Note that ServiceNow® created values for the Client ID and Client Secret fields.
In ServiceNow, copy the value for Client ID. In Snowsight, paste this value into the Client ID field.
In ServiceNow, copy the value for Client Secret. In Snowsight, paste this value into the Client Secret field.
Note
The connector uses a secret (a type of schema-level object) to store the access tokens used to authenticate to the ServiceNow® instance. The connector uses this secret object with a security integration and an external access integration to connect to the ServiceNow® instance.
The secret, security integration, and external access integration are created automatically when you install the connector.
In Snowsight, select Connect.
A dialog appears asking you to login to your ServiceNow® instance with User name and Password. Provide the credentials of the user you want the connector to authenticate with - it needs to have the privileges listed in Preparing your ServiceNow® instance.
Once logged in, confirm that you want to allow the connector to connect to your ServiceNow® account. Select Allow.
Note
If you were redirected directly to this dialog without needing to provide credentials, then you are already logged in to your ServiceNow® instance. Ensure you are logged in as the same user the connector should use and that user has the necessary privileges.
Note: The current logged-in user is shown in upper right corner of the dialog.
OAuth Client Credentials flow
Create an endpoint for clients to access the instance and use it to configure the connector.
Warning
To use this authentication method, your ServiceNow® instance must be upgraded to at least Washington DC release.
Log in to your ServiceNow® instance, then select Homepage.
Search for sys_properties.list.
Search for property with
glide.oauth.inbound.client.credential.grant_type.enabledname in the table and make sure that it is set totrue.Note
If the property doesn’t exist, create it. Click New button and fill the following fields of new property:
Set Name to
glide.oauth.inbound.client.credential.grant_type.enabled,Set Type to
true | false,Set Value to
true.
Search for System OAuth and then select Application Registry.
Select New and then select Create an OAuth API endpoint for external clients.
Enter a name for the OAuth application registry in the Name field.
Select the user that you want the connector to authenticate with in the OAuth Application User field. The user needs to have the privileges listed in Preparing your ServiceNow® instance.
Note
If the OAuth Application User field isn’t available in the form, open Additional actions menu in the upper left corner of the screen. Select Configure > Form builder. Then, add the missing OAuth Application User field to the
Defaultview of the form. Save the form and refresh the page to continue.Select Submit.
The OAuth application registry appears in the list of application registries.
Select the application registry you just created.
Note that ServiceNow® created values for the Client ID and Client Secret fields.
In ServiceNow®, copy the value for Client ID. In Snowsight, paste this value into the Client ID field.
In ServiceNow®, copy the value for Client Secret. In Snowsight, paste this value into the Client Secret field.
Note
The connector uses a secret (a type of schema-level object) to store the access tokens used to authenticate to the ServiceNow® instance. The connector uses this secret object with a security integration and an external access integration to connect to the ServiceNow® instance.
The secret, security integration, and external access integration are created automatically when you install the connector.
In Snowsight, select Connect.
Validate source
This section will check connection to your ServiceNow® instance and, optionally, allow to setup Journal Table.
To enable the propagation of deleted records, set Journal Table that serves as the source of information about deleted records.
You can use either the sys_audit_delete table or a custom one as the source table.
If you do not want to ingest deleted records from ServiceNow® into Snowflake, leave this field empty.
Note
Ensure that the ServiceNow® user for the connector has access to the specified journal table. If not all rows in the
table are visible to the user the connector may fail to fetch entries from the journal table during access validation.
In such a case perform this step by calling the FINALIZE_CONNECTOR_CONFIGURATION
procedure from SQL and provide it either the table_name or sys_id argument, together with journal_table.
Warning
It is not possible to setup journal table after configuring the application. To enable the deleted records propagation after configuration, you will need to reinstall the connector.
Select Validate to finish the configuration process.
During source validation the connector will attempt to check if a previously exported connector state is present in the
destination schema. If the __CONNECTOR_STATE_EXPORT table is present and accessible to the connector, the connector
will try to import the state. When the import finishes successfully, the export table will be deleted. If an error occurs
during import, it’s possible to run the source validation again after fixing the error. If you don’t want to import the
state or you don’t want to fix the import error, transfer ownership of the table from the connector and drop the table.
Side effects
As a result of the configuration steps, the wizard creates the following objects residing outside of the connector’s database that are needed by the connector to work:
Database
CONNECTORS_SECRETwith schemaSNOWFLAKE_CONNECTOR_FOR_SERVICENOWused to store secret object,Secret object in
CONNECTORS_SECRET.SNOWFLAKE_CONNECTOR_FOR_SERVICENOWnamedSECRETwith your ServiceNow® credentials,Network rule object in
CONNECTORS_SECRET.SNOWFLAKE_CONNECTOR_FOR_SERVICENOWnamedNETWORK_RULEused to allow outbound traffic from your account,Security integration named
SNOWFLAKE_CONNECTOR_FOR_SERVICENOW_SECURITY_INTEGRATION, which is used to integrate between Snowflake and a third-party OAuth 2.0 service,External access integration
SNOWFLAKE_CONNECTOR_FOR_SERVICENOW_EXTERNAL_ACCESS_INTEGRATIONis used for communication with ServiceNow.
Note
The above objects are called like this if default SNOWFLAKE_CONNECTOR_FOR_SERVICENOW name was chosen as the application name.
If the chosen application name is changed during installation, these objects’ names will differ accordingly.
Important
Names of these objects, the warehouse and the role used during configuration must not be changed. The connector references them by name. Changing their names or dropping them breaks references and will make the connector unusable.
If necessary, instead of renaming the warehouse, use the UPDATE_WAREHOUSE stored procedure to change the warehouse used by the connector.
Configuring Logging for the Connector
The Snowflake Connector for ServiceNow® uses event tables to store error logs for the connector. To set up an event table manually follow Setting up an Event Table guide.
If the event table isn’t set up, and if you choose to install the connector using the UI wizard, the connector will set up the event table automatically.
Note
This app will collect logs for debugging purposes and write them to an event table in your account and to an event table in the app provider account. Only logs for this app will be included, and these logs are “Connector Usage Data”.
The event table will be created in the following location.
Object
Name
Database
EVENTS_DB
Schema
PUBLIC
Table
EVENTS
Connector application roles
As a Native Application, Snowflake Connector for ServiceNow® defines application roles. They can be reviewed in Role-Based Access Control for Connectors.
Next steps
After installing and configuring the connector, perform the steps described in Setting Up data ingestion for your ServiceNow® data.