Create a catalog
The Snowflake Open Catalog service admin creates a catalog.
The steps to create a catalog depend on your cloud storage provider.
When you create a catalog, you supply information about your external cloud storage, and Snowflake Open Catalog uses that information to create a storage configuration. This configuration stores an identity and access management (IAM) entity for your storage. Open Catalog uses the IAM entity to securely connect to your storage locations in order to access table data, Apache Iceberg™ metadata, and manifest files.
For instructions, see the following sections:
Create a catalog using Amazon Simple Storage Service (Amazon S3)
Prerequisites
An S3 storage bucket in the same region that hosts your Snowflake account
Open Catalog can’t support bucket names that contain dots (for example, my.s3.bucket). Open Catalog uses virtual-hosted-style paths and HTTPS to access data in S3. However, S3 does not support SSL for virtual-hosted-style buckets with dots in the name.
For data recovery features, see your storage provider.
Permissions in AWS to create and manage IAM policies and roles
If you aren’t an AWS administrator, ask your AWS administrator to perform these tasks.
Step 1: Create an IAM policy that grants access to your S3 location
To configure access permissions for Open Catalog in the AWS Management Console, follow this procedure:
Sign in to the AWS Management Console.
On the home dashboard, select IAM.
In the navigation pane, select Account settings.
Under Security Token Service (STS), in the Endpoints list, find the Open Catalog region where your account is located, and if the STS status is inactive, set the toggle to Active.
In the navigation pane, select Policies.
Select Create Policy.
For Policy editor, select JSON.
Add a policy to provide Open Catalog with the required permissions to read and write data to your S3 location.
Note
Replace
*my_bucket*with your actual bucket name. You can also specify a path in the bucket; for example,*my_bucket*/*path*.Setting the
"s3:prefix":condition to["*"]grants access to all prefixes in the specified bucket; setting it to["*path*/*"]grants access to a specified path in the bucket.For buckets in government regions, the bucket ARNs use the
arn:aws-us-gov:s3:::prefix.
The following example policy grants access to all locations in the specified bucket:
   {
      "Version": "2012-10-17",
      "Statement": [
            {
               "Effect": "Allow",
               "Action": [
                  "s3:PutObject",
                  "s3:GetObject",
                  "s3:GetObjectVersion",
                  "s3:DeleteObject",
                  "s3:DeleteObjectVersion"
               ],
               "Resource": "arn:aws:s3:::<my_bucket>/*"
            },
            {
               "Effect": "Allow",
               "Action": [
                  "s3:ListBucket",
                  "s3:GetBucketLocation"
               ],
               "Resource": "arn:aws:s3:::<my_bucket>",
               "Condition": {
                  "StringLike": {
                        "s3:prefix": [
                           "*"
                        ]
                  }
               }
            }
      ]
   }
Select Next.
For Policy name, enter a policy name (for example,
open_catalog_access).Optional: For Description, enter a description.
Select Create policy.
Step 2: Create an IAM role to grant privileges on your S3 bucket
From the AWS Management Console, on the Identity and Access Management (IAM) Dashboard, in the navigation pane, select Roles.
Select Create role.
For the trusted entity type, select AWS account.
Under An AWS account, select This account.
In a later step, you modify the trusted relationship and grant access to Open Catalog.
Optional: To create an external ID, select the Require external ID checkbox, and enter an external ID; for example,
open_catalog_external_id.Note
If you don’t create an external ID when you create a catalog, Open Catalog generates an external ID for you to use. An external ID is used to grant access to your AWS resources (such as S3 buckets) to a third party like Open Catalog.
Select Next.
Select the policy that you created in the previous step, and then select Next.
Enter a role name and description for the role, and then select Create role.
You have now created an IAM policy for an S3 location, created an IAM role, and attached the policy to the role.
To view the role summary page, select View role.
Locate and record the ARN (Amazon Resource Name) value for the role.
Step 3: Create a catalog in Open Catalog
Sign in to Open Catalog.
On the Open Catalog home page, in the Catalogs area, select + Create.
In the Create Catalog dialog, complete the fields:
For Name, enter a name for the catalog.
Catalog names are case-sensitive.
Optional: To create an external catalog, set the External toggle to On.
For information about external catalogs, see Catalog types.
For Storage Provider, select S3.
Optional: To enable outbound private connectivity for the catalog, set the Private Link toggle to Enabled.
For Default base location, enter the default base location for your AWS S3 storage bucket.
Optional: If the catalog will contain objects stored in more than one location, list each additional location (separated by a comma) in Additional locations (optional).
For S3 role ARN, enter the ARN of the IAM role that you created for Open Catalog.
Optional: If you created an external ID when you created an IAM role, for External ID, enter the external ID.
Select Create.
For external catalogs, credential vending is disabled by default. However, you can enable it for the catalog. For details, see Enable credential vending for an external catalog.
Step 4: Retrieve the AWS IAM user for your Open Catalog account
On the Open Catalog home page, in the Catalogs area, select the catalog that you created.
Under Storage Details, copy the IAM user arn; for example,
arn:aws:iam::123456789001:user/abc1-b-self1234.Open Catalog provisions a single IAM user for your entire Open Catalog account. All S3 storage configurations in your account use that IAM user.
Note If you didn’t specify an external ID when you created your IAM role, Open Catalog generates an external ID for you to use. Record the value so that you can update your IAM role trust policy with the generated external ID.
Step 5: Grant the IAM user permissions to access bucket objects
Sign in to the AWS Management Console.
On the home dashboard, search for and select IAM.
In the navigation pane, select Roles.
Select the IAM role that you created for your storage configuration.
Select the Trust relationships tab.
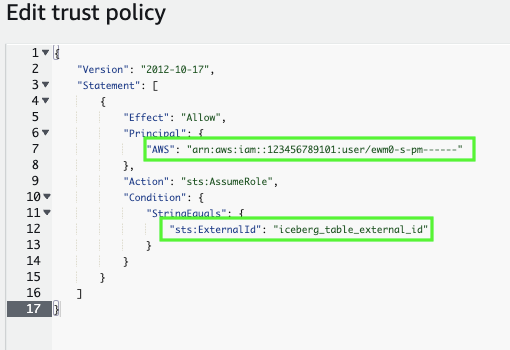
Select Edit trust policy.
Modify the policy document with the catalog storage details that you recorded:
   {
     "Version": "2012-10-17",
     "Statement": [
       {
         "Sid": "",
         "Effect": "Allow",
         "Principal": {
           "AWS": "<open_catalog_user_arn>"
         },
         "Action": "sts:AssumeRole",
         "Condition": {
           "StringEquals": {
             "sts:ExternalId": "<open_catalog_external_id>"
           }
         }
       }
     ]
   }
Where:
open_catalog_user_arnis the IAM user ARN that you recorded.open_catalog_external_idis your external ID. If you specified an external ID when you created the role and used the same ID to create your storage configuration, leave the value as-is. Otherwise, updatests:ExternalIdwith the value that you recorded.Note
You must update this policy document if you create a new storage configuration and don’t provide your own external ID. For security reasons, a new or recreated storage configuration has a different external ID and cannot resolve the trust relationship unless you update this trust policy.
Example policy document for IAM role
To save your changes, select Update policy.
Create a catalog using Cloud Storage from Google
This section covers how to create a catalog and grant Open Catalog restricted access to a Cloud Storage bucket using a storage configuration.
An administrator in your organization grants the IAM user permissions in your Google Cloud account.
Note
To complete the instructions in this topic, you must have permissions in Google Cloud to create and manage IAM policies and roles. If you are not a Google Cloud administrator, ask your Google Cloud administrator to perform these tasks.
For data recovery features, see your storage provider.
Step 1: Create a catalog
Sign in to Open Catalog.
On the Open Catalog home page, in the Catalogs area, select + Create.
In the Create Catalog dialog, complete the fields:
For Name, enter a name for the catalog.
Catalog names are case-sensitive.
Optional: To create an external catalog, set the External toggle to On.
For information about external catalogs, see Catalog types.
For Storage Provider, select GCS.
For Default base location, enter the default base location for your Cloud Storage bucket.
Optional: If the catalog will contain objects stored in more than one location, for Additional locations (optional), list each additional storage location, separated by a comma.
Select Create.
For external catalogs, credential vending is disabled by default. However, you can enable it for the catalog. For details, see Enable credential vending for an external catalog.
Step 2: Retrieve the Google Cloud service account for your Open Catalog account
From the Open Catalog home page, in the Catalogs area, select the catalog that you created.
Under Storage Details, copy the GCP_SERVICE_ACCOUNT ID; for example,
service-account-id@project1-123456.iam.gserviceaccount.com.Open Catalog provisions a single Google Cloud service account for your entire Open Catalog account and uses that service account when accessing storage on Google Cloud.
Step 3: Grant the service account permissions to access bucket objects
In this step, you configure IAM access permissions for Open Catalog in your Google Cloud console.
Create a custom IAM role
Create a custom role that has the permissions required to access the bucket and get objects.
Sign in to the Google Cloud console as a project editor.
On the home dashboard, in the navigation menu, select IAM & Admin > Roles.
Select Create Role.
For Title, enter a title for the custom role.
Optional: For Description, enter a description for the custom role.
Select Add Permissions.
In Filter, select Service, and then select storage.
Filter the list of permissions, and select the following from the list:
storage.buckets.getstorage.objects.createstorage.objects.deletestorage.objects.getstorage.objects.list
Select Add.
Select Create.
Assign the custom role to the Google Cloud service account
Remain in the Google Cloud console for this procedure.
On the home dashboard, in the navigation menu, select Cloud Storage > Buckets.
Filter the list of buckets, and select the bucket that you specified in your Open Catalog storage configuration.
Select Permissions > View by principals, and then select Grant access.
Under Add principals, paste the service account ID that you copied earlier.
Under Assign roles, select the custom IAM role that you created earlier, and then select Save.
Create a catalog using Azure storage
This section covers how to grant Open Catalog restricted access to your own Microsoft Azure container using a storage configuration. Open Catalog supports the following Azure cloud storage services for storage configurations:
Blob storage
Data Lake Storage Gen2
General-purpose v1
General-purpose v2
An administrator in your organization grants the IAM user permissions in your Azure account.
Note
Completing the instructions in this topic requires permissions in Azure to create and manage IAM policies and roles. If you are not an Azure administrator, ask your Azure administrator to perform these tasks.
For data recovery features, see your storage provider.
Step 1: Create a catalog
Sign in to Open Catalog.
On the Open Catalog home page, in the Catalogs area, select + Create.
In the Create Catalog dialog, complete the fields:
For Name, enter a name for the catalog.
Catalog names are case-sensitive.
Optional: To create an external catalog, set the External toggle to On.
For information about external catalogs, see Catalog types.
For Storage Provider, select AZURE.
Optional: To enable outbound private connectivity for the catalog, set the Private Link toggle to Enabled.
For Default base location, enter the default base location for your Azure storage container by applying from this list the applicable format to the path to the primary endpoint for your container:
Endpoint type
Format
Default base location example
Blob
abfss://<container_name>@<storage_account_name>.blob.core.windows.net/<directory_name>/abfss://my_container1@my_storageaccount1.blob.core.windows.net/my_directory1/Azure Data Lake Storage (ADLS)
abfss://<container_name>@<storage_account_name>.dfs.core.windows.net/<directory_name>/abfss://my_container2@my_storageaccount2.dfs.core.windows.net/my_directory2/Note
You copied this path and the name of your container when you created a Microsoft Azure container.
In the path to the primary endpoint for your container, the name of your storage account is the text between
https://and the first period in the path.Use the
abfss://prefix, nothttps://.
Optional: If the catalog will contain objects stored in more than one location, in the Additional locations (optional) field, list each additional storage location, separated by a comma.
For Tenant ID, enter the Azure Tenant ID.
Select Create.
For external catalogs, credential vending is disabled by default. However, you can enable it for the catalog. For details, see Enable credential vending for an external catalog.
Step 2: Copy the values for the storage location
On the Open Catalog home page, in the Catalogs area, select the catalog that you created.
Under Storage Details, copy the following values:
Property
Description
AZURE_CONSENT_URLURL to the Microsoft permissions request page.
AZURE_MULTI_TENANT_APP_NAMEName of the Snowflake client application created for your account. In a later step in this section, you grant this application permission to obtain an access token on your allowed storage location.
You use these values in the following steps.
Step 3. Grant the Azure service principal permissions to an access token
In a web browser, navigate to the Microsoft permissions request page (the Azure consent URL).
Select Accept.
This action allows the Azure service principal created for your Open Catalog account to obtain an access token on specified resources inside your tenant. Obtaining an access token succeeds only if you grant to the service principal the appropriate permissions on the container. The Microsoft permissions request page redirects to the Snowflake corporate site (snowflake.com).
Sign in to the Microsoft Azure portal.
Open Azure Services > Storage Accounts.
Select the name of the storage account that the Open Catalog service principal needs to access.
Select Access Control (IAM) > Add role assignment.
Select the desired role to grant to the Open Catalog service principal, such as the Storage Blob Data Contributor role.
The Storage Blob Data Contributor role grants read and write access to the Open Catalog service principal and grants write access to the storage location.
Note
Open Catalog issues a user delegation shared access signature (SAS) token. The SAS token for accessing the storage blobs is scoped at the level of container instead of blob or directory. The role you select should have permission to create the user delegation key. For a list of these roles, see Assign permissions with RBAC.
Select Next.
Select + Select members.
After an hour, search for and select the Open Catalog service principal, which is the Azure multi-tenant app name property. Search for the string before the underscore in the property value.
Important
It can take an hour or longer for Azure to create the Open Catalog service principal requested through the Microsoft request page in this section. If the service principal is not available immediately, wait an hour or two and then search again.
If you delete the service principal, the catalog will stop working due to authentication failure.
Select Select.
Select Review + assign.
Note
It can take up to 10 minutes for changes to take effect when you assign a role. For more information, see Symptom - Role assignment changes are not being detected in the Microsoft Azure documentation.