Control network traffic to Snowflake Open Catalog with network policies
Create network policies to control network traffic to a Snowflake Open Catalog account. When creating a network policy, you specify the following lists for the network policy:
The list of IPv4 addresses that are permitted to access the Open Catalog account (the allowed list for the policy)
If you need to explicitly block IPv4 addresses, the list of IP addresses that are restricted from accessing the Open Catalog account (the blocked list for the policy)
When you add IP addresses to the allowed list of a network policy, you don’t have to use the blocked list to explicitly block other IP addresses of the same type; only the allowed IP addresses have access. Typically, you use the blocked list to restrict IP addresses included in a CIDR block range that you add to the allowed list.
For example, if you add a single IPv4 address to the allowed list, all other IPv4 addresses are blocked. There is no need to use the blocked list to restrict access from other IP addresses.
You can create multiple network policies, if needed. However, you can only activate one network policy at a time.
If a network policy has the same IP address values in both the allowed list and blocked list, Open Catalog applies the
values in the blocked list first. For example, if 192.168.1.99 is added to the allowed list through a CIDR block range such as
192.168.1.0/24, but 192.168.1.99 is specified in the blocked list, 192.168.1.99 is ultimately added to the blocked list.
Step 1: Create a network policy
Caution
Ensure that the network policy you create grants the IP address for your computer access to the Open Catalog account. Otherwise, when you activate the network policy, you’ll be locked out of the account. If you are using private connectivity in the Open Catalog service, do the following:
Configure the external service, such as AWS PrivateLink, to generate private IP addresses.
Use CIDR notation to add the private IP addresses to the allowed list for your network policy.
To create a network policy, follow these steps:
Sign in to Open Catalog.
From the menu on the left, select Security.
Select + Network Policy.
Enter a name for the network policy.
Note
A network policy name can’t contain spaces or special characters other than underscores.
Network policy names are treated as case insensitive and are saved with uppercase letters.
To add IPv4 addresses to the allowed list, follow these steps:
In the Allowed IPs field, add an entry. CIDR notation is supported. For an example, see Use CIDR notation to specify allowed IP addresses.
Press Enter.
If needed, repeat the previous steps to add another entry.
Optional: To add IPv4 addresses to the blocked list, follow these steps:
In the Blocked IPs field, add an entry.
Press Enter.
If needed, repeat the previous steps to add another entry.
Select Create.
Step 2: Activate a network policy
After you create a network policy, you need to activate it for its policy to take effect and restrict network traffic. If you created multiple network policies, you can only activate one network policy at a time.
Caution
Before you activate a network policy, ensure that it grants the IP address for your computer access to the Open Catalog account. Otherwise, you’ll be locked out of the account.
Sign in to Open Catalog.
From the menu on the left, select Security.
From the list of network policies, locate the network policy you want to activate.
Under the MORE column, select … for the network policy you want to activate.
Select Activate.
Note
If another network policy is currently activated, it’s automatically deactivated when you activate the network policy.
Deactivate a network policy
Sign in to Open Catalog.
From the menu on the left, select Security.
From the list of network policies, locate the network policy you want to deactivate.
Under the MORE column, select … for the network policy you want to deactivate.
Select Deactivate.
Delete a network policy
Note
If the network policy you want to delete is activated, first deactivate it. You can’t delete a network policy that is activated.
Sign in to Open Catalog.
From the menu on the left, select Security.
From the list of network policies, locate the network policy you want to delete.
Under the MORE column, select … for the network policy you want to delete. Select Delete.
Examples
Use CIDR notation to specify allowed IP addresses
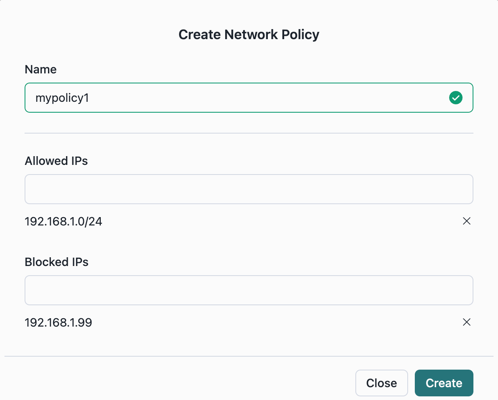
The following network policy allows requests from all IP addresses in the range of 192.168.1.0 to 192.168.1.255, except 192.168.1.99.
IP addresses outside the range are also blocked.
The entry for the allowed list of the policy uses CIDR notation.
Allowed IPs = 192.168.1.0/24
Blocked IPs = 192.168.1.99